Video One
Video Two
Video Three
Video Four
Video Five
Video Six
Wednesday, July 6, 2016
For Debra :-)
Okay, here are your instructions for getting BookFunnel set up. :-)
Login:
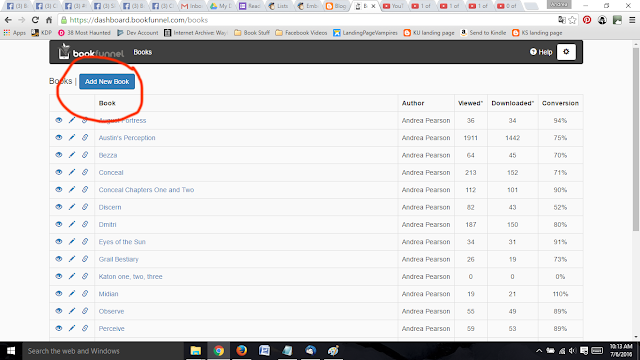
Click on Books:
Click on Add New Book:
Put in a name for the book (can be same as title. If the title is long, I sometimes abbreviate or shorten to just one word. Readers won't see this)
Enter Book Title (readers see this)
Put in author name
Scroll down...
Add a page title, if you want one. I usually just repeat the book title.
Add a book tagline - this is the same thing as a hook. Or can be the first sentence or paragraph of the description.
Add book description. Readers will have to click "read more" on the tagline to see this part (unless that's changed. I don't think it has)
Put in a book cover, epub file, and mobi file. These three are required. I also like putting in a PDF file in case people have problems. (Which doesn't happen all the time.)
Click on Save Book
Then click on I'm Done Editing.
Find the book and click on it.
You'll get that lovely red bar, telling you there isn't a link. Click on "Create Link."
Give the link a name. I usually call it the title of the book, since I haven't yet had any links that expire. But if you want to have a link that expires (for ARC copies, for example), you'd want a different name than just the title here, to prevent confusion for yourself. Readers won't see this name.
For your freebie, you don't want an expiration date. Leave it as is. Leave the rest as is too.
Click on "Create Link."
Copy that link there. This is the link you'll replace mine with in your first and second automation emails. Once you've got that link in those automation emails, you're all ready to go - you don't need to do anything else, other than what we went over yesterday. If I were you, though, I'd subscribe to your list and test the whole process.
Track results of your downloads here.
Once you get to editing the automation emails, you might have more questions for me. Let me know if you do. :-)
Andrea
Subscribe to:
Comments (Atom)


